각 해당코드들은 url 첨부한 것으로 확인
다 넣기엔 너무 많고, 복잡해지기에,,🥹
CRUD
C : create
R : read
U : update
D : delete

📌폼(form)데이터 주고 받기
view templates <form> html 요소인 폼태그에 담긴 데이터
where? ==> action=""
how? ==> method=""
보낼지 적어줘야함.
이 데이터를 controller의 DTO라는 객체로 받음.

해당 mustache <form> 내에
dto 필드와 동일한 이름(name="" 속성) 을 넣어주면
연결해서, 데이터를 전달함.
※자바코드가 바뀐다면 재실행 시켜줘야함.
📌데이터 생성 with JPA

server는 java언어 // database는 sql언어
서로 알아듣지 못함.
👉JPA가 그걸 해결해줌
java언어를 db가 이해할 수 있게 해줄 뿐 아니라,
데이터 관리에 편리한 여러 기능들까지 제공함.

JPA의 핵심도구 : Entity, Repository
Entity : java객체를 db가 이해할 수 있게 규격화된 데이터
Repository 를 통해 db에 전달되고 처리됨.

Controller
1. dto를 entity로 변환
Article article = form.toEntity();
2. repository에게 entity를 db에 저장하게 함
Article saved = articleRepository.save(article);
✅✅✅✅✅
@Entity >> db가 해당 객체를 인식
@Column >> db에서 관리하는 테이블이라는 단위와 연결되게 해줌
@Id >> 대표값을 지정(ex. 주민등록번호)
@GeneratedValue >> 자동생성하기 위한 어노테이션
@Autowired : java에서는 새로운 객체생성하지만, 스프링부트가 대신해주기때문에 객체 생성 안해도됨!
미리 생성해좋은 객체를 가져다가 자동연결함.(DI 의존성 주입)
📌DB테이블과 SQL
db에 저장된 데이터는 테이블(행,열)이라는 틀에 의해 관리됨.

※application.properties
#h2 DB, 웹 콘솔 접근 허용 spring.h2.console.enabled =true
'localhost:8080/h2-console'
-> 서버를 실행할 때마다 JDBC URL 주소가 바뀜,
IDE : console 내에 ctrl+f 'jdbc' 하면 'jdbc:h2:mem:~~' 값 복사해서 입력/
sql
read : insert * from article;
insert : insert into article(id,title,content) values('3','ccc','333');
📌롬복(lombok)과 리팩터링(refactoring)
기존 코드들을 간소화
도구 : 롬복(lombok) 라이브러리
-> 여러 필수코드 반복을 최소화,
로깅(프로그램 수행과정을 기록으로 남김)기능을 통해 개선 = 리팩터링(코드 구조or 성능 개선 or 압축)
※ build.gradle >> dependencies
//롬복 추가 >> rebuild
compileOnly 'org.projectlombok:lombok'
annotationProcessor 'org.projectlombok:lombok'
+
intellij는 마켓플레이스에서 다운
sts : lombok (jar) 다운받아 sts(SpringToolSuite4).exe 파일있는 곳에
같이 위치하게 함.

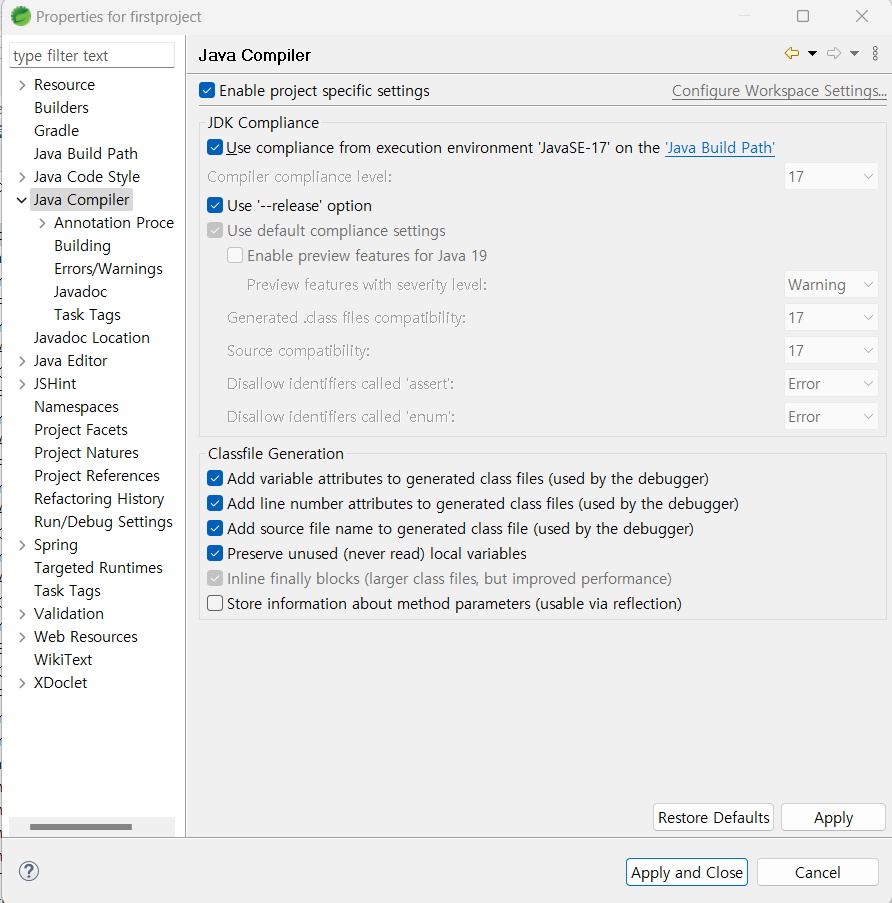
※ project 우클릭 >> properties >> java compiler
>> Enable project specific settings 체크
👉DTO, Entity 리팩터링
생성자 대신 @AllArgsConstructor
overriding 된 ToString 메서드 대신 @ToString
+ @NoArgsConstructor 디폴트 생성자( 파라미터가 아무것도 없는 생성자)
👉Controller 리팩터링
System.out.println(); >> log.info();
System.out.println()는 실제 서버에서 기록에 남지도 않고,
서버 성능에도 악영향을 끼침. 고로 사용x, 로깅기능으로 대체
@Slf4j //로깅을 위한 어노테이션
📌데이터 조회(read)하기 with JPA

1. 사용자가 브라우저를 통해 데이터 요청
2. 요청 url을 controller가 받음
3. 찾고자하는 데이터의 정보를 repository에게 전달
4. repository가 db에 요청 >> db는 해당 데이터 찾아서 Entity로 반환
//id로 데이터를 가져옴
Article articleEntity = articleRepository.findById(id).orElse(null); // 해당 id 가 없다면 null 반환
5. Entity는 Model을 통해 View templates로 전달
//가져온 데이터를 모델에 등록!
model.addAttribute("article",articleEntity);
6. 최종 결과페이지가 완성되어 client로 보내짐.
//보여줄 페이지를 설정!
return "articles/show";
※ controller
@GetMapping("/articles/{id}")
{id} 라는 변수는 url path로부터 입력됨.
그 변수를 파라미터로 받아옴.
@PathVariable = path로부터 입력이 된다.
( @PathVariable Long (타입) id)
※ articles/show.mustache
{{>layouts/header}}
<table class="table">
<thead>
<tr>
<th scope="col">ID</th>
<th scope="col">Title</th>
<th scope="col">Content</th>
</tr>
</thead>
<tbody>
{{#article}}
<tr>
<th>{{id}}</th>
<td>{{title}}</td>
<td>{{content}}</td>
</tr>
{{/article}}
</tbody>
</table>
{{>layouts/footer}}
{{#article}} ~~{{/article}} : article에 담겨진 데이터 가져올거얌~
📌데이터 목록 조회(read)
여러 개의 데이터 조회 --> 이전과 동일하나,
Entity를 List형식으로 받는다는 점만 다름.
controller
@GetMapping("/articles")
public String index(Model model) {
List<Article> articleEntityList = (List<Article>)articleRepository.findAll();
model.addAttribute("articleList",articleEntityList);
return "articles/index"; //articles/index.mustache }
※해당 view {{#articleList}} ~ {{/articleList}}
※

📌링크(link)와 리다이렉트(redirect)
link : 요청을 간편히 전송, 보다 편리한 요청
html <a>,<form>

redirect : 클라이언트에게 재요청을 지시하는 것 , 보다 편리한 응답 가능해짐.

return "redirect:/articles/"+saved.getId(); ==> 데이터 추가내용 확인(상세페이지)
※Entity에 @Getter 추가
📌수정 폼(form)만들기

ArticleController - edit(){}
edit.mustache
참고
📌데이터 수정(update)하기


클라이언트에서 서버로의 데이터 전송은 다양한 통신 규약
즉, 프로토콜을 통해 이루어짐.
protocol
FTP : File Transfer Protocol
SMTP : Simple Mail Transfer Protocol
SSH : Secure Shell
등
웹서비스에서 이용하는 프로토콜 : HTTP(Hyper Text Transfer Protocol)

SQL
select
insert
update
delete
Controller
@PostMapping("/articles/update")
public String update(ArticleForm form) {
//1.DTO >> Entity로 변환
Article articleEntity = form.toEntity();
//2.Entity >> DB로 저장
//2-1: DB서 기존 데이터를 가져온다
Article target = articleRepository.findById(articleEntity.getId()).orElse(null);
//2-2:기존 데이터에 값을 갱신한다
if(target != null) {
articleRepository.save(articleEntity);
}
//localhost:8080/h2-console로 확인(돌리고 있는 주소 붙이기)
//3.수정 결과 페이지로 리다이렉트 한다!
return "redirect:/articles/"+articleEntity.getId();
}
※form태그는 GET/POST메소드만을 지원
📌데이터 삭제(delete)하기


@GetMapping("/articles/{id}/delete")
public String delete(@PathVariable Long id, RedirectAttributes rttr){
//1.삭제대상을 가져온다
Article target = articleRepository.findById(id).orElse(null);
log.info(target.toString());
//2.대상을 삭제
if(target != null) {
articleRepository.delete(target);
//휘발성, 일회용, 휘발성 데이터
rttr.addFlashAttribute("msg","삭제가 완료되었습니다.");
}
//3.결과데이터를 리다이렉트한다
return "redirect:/articles";
}
※ RedirectAttributes : (리다이렉트 했는데 삭제가 되었다는 것을 알려주기 위해)
리다이렉트에서 사용하기 위한 데이터는 RedirectAttributes 객체를 통해
addFlashAttribute를 사용해 데이터 등록할 수 있음.
sql
ex)
delete article where id = 3;
📌데이터 CRUD와 SQL쿼리

Query : DB에게 수행을 요청하는 구문
insert - 생성/ select -조회/ update-수정/delete-삭제
※ application.properties
#JPA 로깅 설정
#디버그 레벨로 쿼리 출력
logging.level.org.hibernate.SQL=DEBUG
#이쁘게 보여주기
spring.jpa.properties.hibernate.format_sql=true
#파라미터 보여주기
logging.level.org.hibernate.type.descriptor.sql.BasicBinder=TRACE
#DB URL 고정 설정
#유니크 URL 생성 x
spring.datasource.generate-unique-name=false
#고정 url 설정 (error로 ;MODE=MySQL 추가)
spring.datasource.url=jdbc:h2:mem:testdb;MODE=MySQL
YOUTUBE 홍팍님 강의 내용을 토대로 작성 및 정리
해당 코드들은 아래에서 확인
https://cloudstudying.kr/courses/65
스프링 부트, 입문! | CloudStudying
cloudstudying.kr
'STUDY > [홍팍]SpringBoot' 카테고리의 다른 글
| 28~31 더 나아가기 (0) | 2023.03.29 |
|---|---|
| 18~21 #REST API와 테스트 (0) | 2023.03.27 |
| 4~6 #모델, 뷰, 컨트롤러 (0) | 2023.03.26 |
| 1~3 #시작하기 (0) | 2023.03.25 |
| 입문 목차 (0) | 2023.03.25 |


